The focus of this article is to show how easy it is to create a WordPress website. By following the instructions below, you should be able to get a WordPress website online in under an hour.
What makes up a website?
When I first started out with websites, the only way we were able to create them was to open up notepad (..or another choice of code editor..) and type out code like HTML, CSS and for functionality add in some PHP. Each of these languages took time to learn while I was in college.
HTML or Hypertext Markup Language is the language that provides the structure of your page. You will likely see tags like <header></header>, <section></section> in the code. These are elements that will house the content that you are creating on the website.
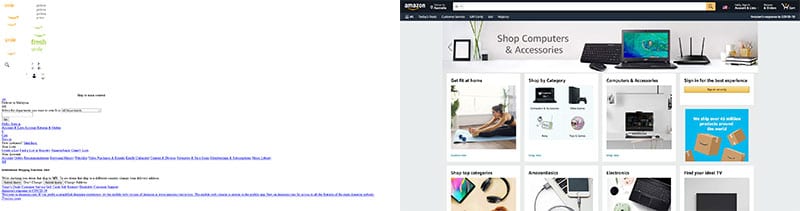
CSS or Cascading Style Sheets provides the styling of the website. Using CSS, you would tell the computer what font to use, or what colour that font must be or what size it should be. Below you can see the same Amazon homepage. On the left you can see the website with no CSS applied (..showing mostly just the HTML..) and on the right the CSS is applied.
PHP or Hypertext Preprocessor is widely used to add functionality to your website. Connecting your beautifully designed pages to a database, we used PHP. Today, while PHP is still likely the most used programming languages to build websites, there have been a growing popularity in other languages like Javascript, GoLang and even Python.
So as you can see, the fact that you would need to know all the languages above to create a website can really put you off creating the site.
This is where platforms like WordPress comes to the rescue.
What is WordPress?
WordPress is a content management system or a CMS for short. It is a platform that is built to run your website without you having the need to understand all the languages mentioned above. In fact, it is very similar to using programs like Microsoft Word.
Is WordPress used by many people?
Short answer – Yes!
Longer answer – WordPress powers 36% of the top 1m websites. If you are like me and not that great at math, that equates to around 360 000 people, just out of the top 1m sites. Considering there are 1.8 billion websites, I am quite confident to say that a lot of people use WordPress. A study was run that shows that there are 17 WordPress websites being updates every second. Yes. Every. Single. Second.
Why WordPress makes a good choice
With all the options one has available these days, with sites like Wix or Squarespace, there are still many reasons why choosing to create a WordPress website is still a better option. Let’s go through some of them now.
The platform is free open source software
WordPress comes in two versions; WordPress.com and WordPress.org. Both of these platforms are free to start using. The major difference between the two is that WordPress.com is hosted by WordPress themselves while WordPress.org is a self hosted option. Self hosted means that you can download the software for free and then set it up on a server without having to pay a cent for the software. There are however costs involved for the server, which I will explain more on later.
Not only is the fundamental platform free but if you want to extend your website functionality further, you can make use of many free plugins. Plugins are snippets of code that developers have written to provide certain functionality. Some examples of these plugins are; event management, e-commerce or even galleries.
It is very customizable
WordPress may have started out as a blogging platform but it has drastically changed over the years. As mentioned above, you can add plugins into your WordPress website to turn it into almost any kind of website without having to add any code. You can quite easily create WordPress websites like;
- Blogs
- Personal Website
- Business Website
- e-Commerce Website
- Rating Website
- Magazine Publication Website
- Online Learning School Website
- Non Profit Websites
I could go on and list many more but am sure you are getting the idea – WordPress can be used to create almost any kind of website.
It is easy to learn and has a huge community
As I mentioned earlier, WordPress is no more difficult than using Microsoft Word. When I was still doing consulting I used to tell my clients that WordPress is easy enough for my (..then..) 6 year old niece to use but powerful enough to run some of the top websites on the internet.
Due to the fact that there are so many users using WordPress, we naturally have many places to go to if we need help. There are forums, youtube videos, online courses and even huge annual events to learn more about WordPress.
SEO is a priority
WordPress has always been known for having a great SEO (..Search Engine Optimization..) functionality built into the platform. This is due to the fact that it automatically generates title tags and meta descriptions for your pages and posts. The make it easier for search engines to find and index your website so that users can find your site easier.
In addition to the great built in SEO, you can extend it with some premium (..paid for..) plugins that take the SEO functionality to the next level.
You own your own website
One of the best benefits of going with WordPress over the other options available like Wix and Squarespace is that you own and control your own website. This allows you to build the website as you want/need it rather than how your provider allows you to build it.
What is a Domain name?
When you create a website and place it on a server online, it is given an address. This address is called an IP address and is usually a series of numbers like 192.168.15.65 which can be a little difficult to remember – right?
I always like to ask people if they know their top 10 contacts in their mobile phone’s numbers. I certainly do not. We have it much easier now when we can just look for the contacts name and hit the green button and the phone will do the rest. Well domain names work much in the same way.
Domain names are the names we type in to visit a website. Like for this site, you would type baldafrican.com in the url which would then be converted to the IP address in order to find the server where my website is setup on.
There are a few ways to register your domain name. Many beginners prefer to get the domain and hosting from the same company and if that makes it easier for you please go ahead. Others, myself included, prefer to split the domain name and hosting so that if something goes wrong with the hosting I can just setup another server from a backup of my website on another host and point my domain name to it asap. This added level has helped me lower my stress level over the years.
How to select a domain name
When selecting your domain name, it is good to keep in mind the purpose of your website.
- If it is a hobby site, using your name or nick name is fine.
- If it is a business website, it is preferable to go with something close to either your company name or your company’s product/service.
Whenever possible, try to get the .com extension (..website.com..) as these are well known by people and therefore trusted by most. Once I used the .io extension and users would still type in website.io.com when trying to access my site. So take it from me and simplify, if you can get the .com extension – get it!
What is a web host?
A web host is basically a vendor that provides a computer for you to install your website on. There are a number of types you can select from;
Shared hosting – The cheapest option. Shared hosting (..starting around $3 per month..) usually bundles thousands of websites on one server. All the websites on the server share the total resources of it. So if you have a noisy neighbour, your site will suffer too.
VPS hosting – VPS or Virtual Private Server (..starting around $10 per month..) is a step up from shared in the sense that while you still share a server with other websites, you are allocated a defined amount of resources that only your website can use.
Dedicated hosting – Dedicated (..starting around $100 per month..) is when you get a whole server just for your website. Typically they are quite expensive but their performance is great!
Cloud hosting – Cloud hosting (..starting around $10 per month..) is almost like a VPS hosting on steroids. You also share the server with other sites but in this case the server is HuGE! ..and the resources allocated to your site is containerized and therefore as good as dedicated (..dependent on the specs..). The great benefit of cloud though is how easy it is to scale. If you want more memory (..as an example..), you can select it in the dashboard and 5 to 10 minutes later, it is done whereas with dedicated, you would need to place a requisition for for an engineer to go and physically install new memory to upgrade it – which takes time.
My preferred hosting companies
Over the years I have changed hosts – a lot!
I started out with shared hosting but quickly learned the limitations of it. So I went up to a VPS which works well but unless you are prepared to pay for the managed VPS, it can take quite a bit of time to maintain. Finally I found companies that specialize in WordPress and offered “Managed WordPress hosting” which really is just a fancy way of saying that they focus primarily on WordPress websites.
While I will always recommend Kinsta for WordPress website hosting, I do understand that they are out of the budget of most people starting out.
In their place, for those starting out, I recommend using Dreamhost.
They offer an economical way to start your adventure in the online world. Dreamhost is one of the hosting companies that is endorsed by WordPress themselves. Their plans start from $2.59 per month while Kinsta starts at $25.
If the $25 is out of your reach at this moment, my suggestion would be to start out with Dreamhost and as your website grows and starts generating revenue, you then upgrade to Kinsta.
In light of this, for the practical part of this tutorial I am going to show you how to create a WordPress website using Dreamhost as the hosting provider.
Step 1 – Setup Hosting
There are a number of ways to install WordPress but to ensure that this tutorial is concise and easy to follow, I am going to show the way to do it with Dreamhost’s own installation. Let’s start by setting up your hosting.
Go to Dreamhost’s website and sign up for an account
Click the WordPress option in the menu.
Once the page loads click on the WordPress Basic tab to see the pricing.
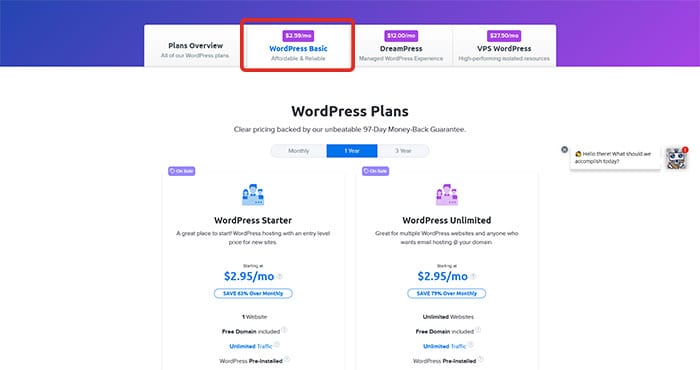
Here you can select what suits your budget.
My recommendations are to go for the WordPress Unlimited and sign up for at least 1 year hosting.
The reason for the unlimited plan is that you are provided with unlimited email addresses to use for your brand. This would be an email like [email protected] or [email protected] which looks more professional than using a yahoo address.
The reason for the 1 year hosting is firstly it is cheaper and second, it will include your domain name for free which makes it even more cheaper. We all love to save money right?
You might ask why not save even more with the 3 year plan? You could go for it but I usually advise against it. First, it may be cheaper but you still have to outlay the cash which means you have to pay for the 3 years upfront. Second, as your website grows you may want to move it to managed WordPress hosting so you do not still want to be tied to this contract and lose out on money.
So make your choice and click the Sign Up Now button
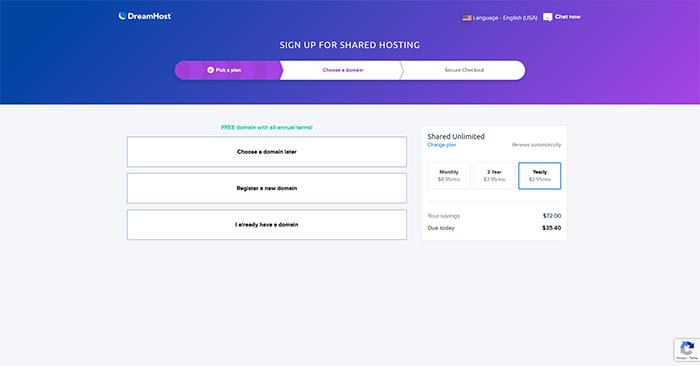
First up we will need to select your domain name. Remember from above, this is the name of your website. You will want to try and name it something relevant to the content you want to create. If you already have a domain you can enter it here, else click Register a new domain
Type in your chosen domain and click the blue magnifying glass to see if it is available. Remember to try and get the .com as much as possible.
If your domain name is available, you will see a message similar to the one below.
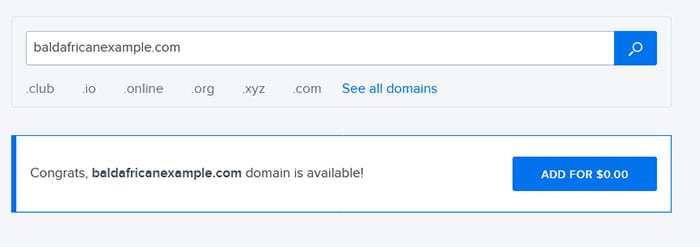
Click the blue Add for $0.00 button.
Install WordPress
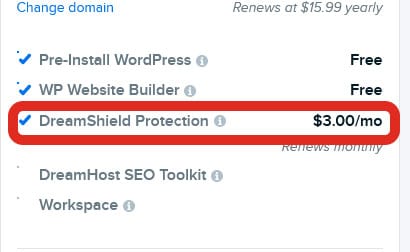
One of the benefits of using Dreamhost for your hosting is that they pre-install WordPress for you so that you do not need to.
In the settings make sure you Check the option for Pre-Install WordPress. The WP Website builder is optional – so you can uncheck that one. I prefer to use a premium theme on my WordPress sites which I will explain a little more on later.
Make sure you also UNCHECK the option for the Dreamshield protection – else you will be charged an extra $3 a month.
Now go ahead and fill out all the information and hit the purple Submit Order button.
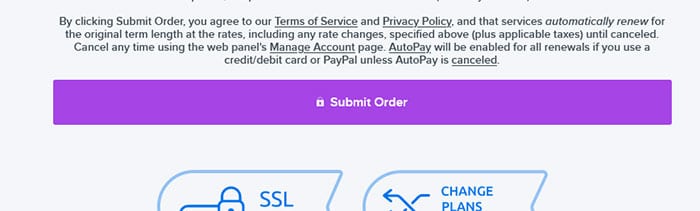
This will set your hosting up and send you a ton (..ok like 6..) emails to your inbox to confirm your order. You will be prompted to enter a password. Here you should enter a password that is difficult to guess. After that, you will be able to enter into your hosting dashboard.
Set SSL for your WordPress website
An SSL certificate is what places the s at the end of the http before the domain name. This is required these days else Google will punish your site in their rankings.
Once in your dashboard, head to your domains section in the left column and click the SSL/TLS Certificates.
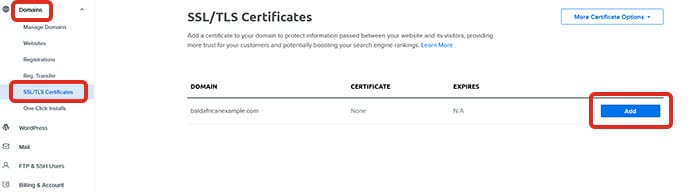
Here you click Add. And then Select this Certificate.
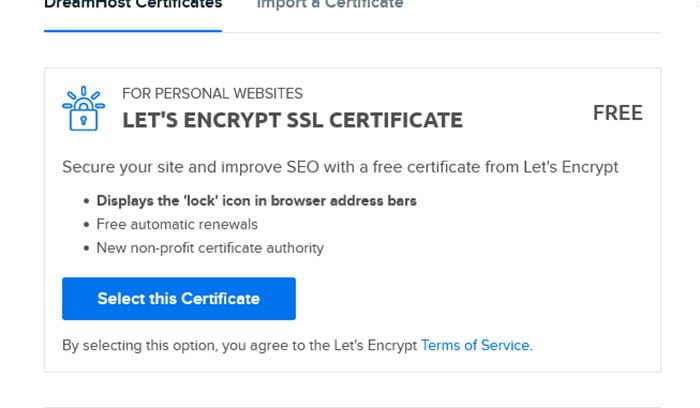
This will add the SSL certificate for your website and change your http to https.
Set email for domain
Once that is done, head back to your main dashboard so we can setup your email.
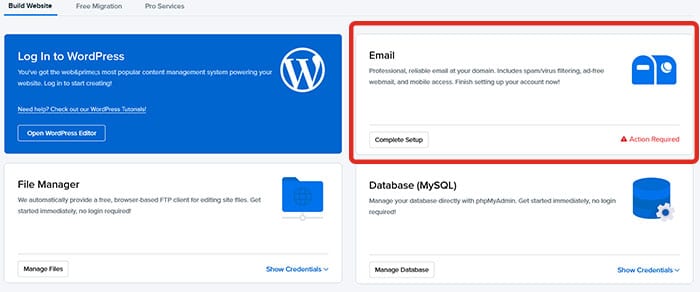
Click the Complete Setup button in the Email section.
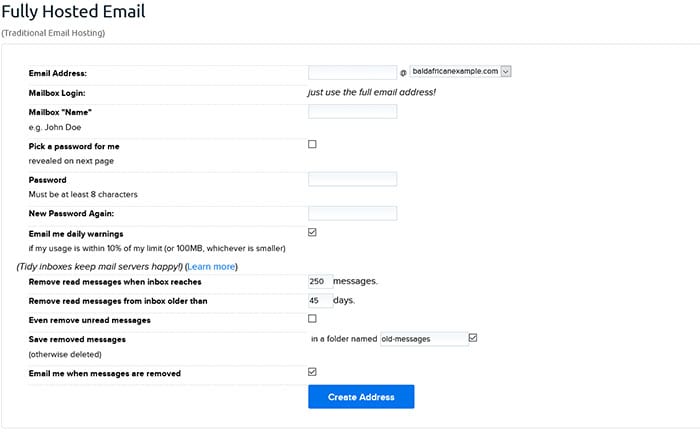
Here you would enter the email address you would like to use for your site. In the email address field, be sure to only type the part that comes before the @ sign in the email address. Then add a good password that will be difficult to guess (..remember to write it down..) and then click the blue Create Address button.
After that is done, go back to your main dashboard and click on the Open WordPress Editor button.
Select a theme for your WordPress website
Time for us to add a theme to your WordPress website. A theme is how your website will be presented to the users. It plays a huge part in how your website looks and feels.
There are many types that you can get but they all fall into one of two categories;
Free
Premium
There are literally thousands of free themes on the WordPress repository for you to choose from but I do recommend that if possible go with a premium theme.
Reason for this is that premium themes are usually backed by active developers meaning if there is any security update, they will patch the theme accordingly. Free themes are often done by freelancers who are doing a bit on the side so are not updated as often.
Some Premium themes I recommend are;
Divi
Astra
Elementor
The X (Cornerstone) theme
In the left hand column select Appearance and then click on Themes.
Here it will list all the themes that are currently installed on your WordPress website.
In the top, click the Add New button.

Here you will see all the themes that are in the WordPress theme repository. It is good to note that ALL of these themes are free.
To install a theme, you would just hover over the theme that you like and click install. If you would like to see what the theme would look like as a website, you can click preview.
Once installed, you can activate the theme and the styles will be applied across your website.
If you have purchased a premium theme, you would click the Upload Theme button at the top of the screen and upload the theme into your installed themes. Once there, you click activate and it is using it. Yes, it is that simple.
Start Adding Content
So now we are ready to add some content. In WordPress, content is added by creating either a page or a post. As we are looking to create some pages that will remain as part of our website structure, we will use pages.
Common pages that are usually added to a WordPress website are;
- Homepage
- About Us page
- Our Services page
- Contact Us page
As you work through which pages would best suit your site, also think about the potential visitors coming to your site. What would be most appealing to them? Would it be better to add images or videos? Or would just text work best for them?
QUICK TIP!
If you are using a premium theme like Divi for instance, you are able to add full page layouts with just one click at no extra cost. It comes as part of the fee for the theme. For people that are just starting out and not sure how best to design their sites, these layouts make your life a lot easier. Not to mention how much time they save!
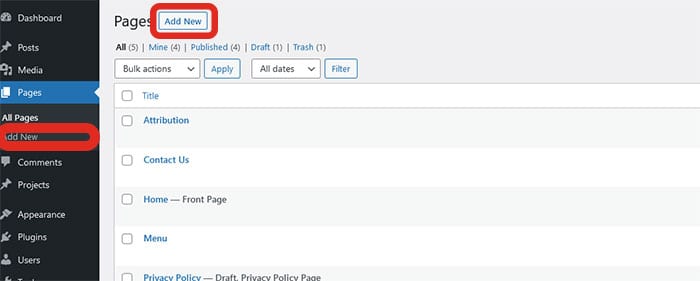
To add a new page go to Pages -> Add New
This will open up the Gutenberg editor where you will be able to add the Title of the page as well as the content. Your font type and colours may vary dependent on the theme you are using.
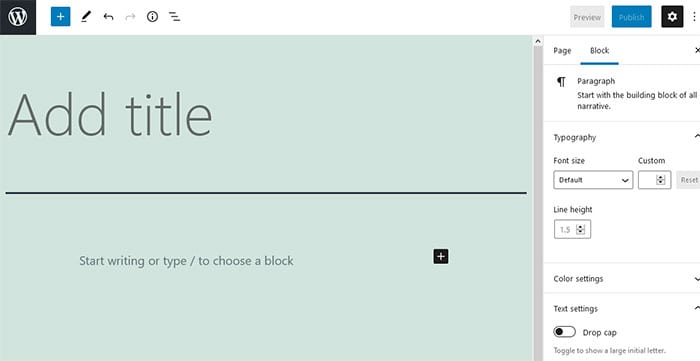
From here on it will work pretty much like when typing in Microsoft Word. You can create headings and paragraphs as well as add images and videos. When you are done adding content to the page, click the Publish button in the top right.
Once done with the page, continue to add as many pages as your website needs.
Setup a menu
Since you plan to create many pages, you will need a way for people to find them easily. This is where the menu comes in.
When viewing websites, you will notice the menu in either the top right or sometimes in the sidebar. These menus allow you to visit certain pages by simply clicking on the menu item. A very common menu you see on many smaller sites is something like Home | About Us | Our Services | Contact Us
To create this menu, you would need to go to Appearance -> Menus
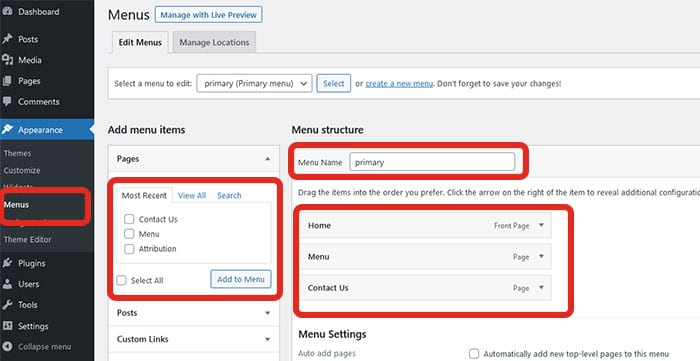
If you do not have a menu available in there yet, enter a Menu name, select the checkbox next to primary menu and click the create menu button at the bottom right of the screen.
Once done, you are now able to add posts and pages to your menu.
Under the Add menu items section, select the items you want in your menu by clicking on their checkbox. Once done click the Add to Menu button.
Here you can organize your menu into the order that you want by simply clicking and dragging the menu item into position.
Once your menu is done, click Save Menu and you are done.
Customize your website
When you want to customize your WordPress website, it really does depend on the theme that you have activated for your site. On most themes you can go to Appearance -> Customize where it will provide you with options to change things like;
- Website name
- Font colour, type and size
- Background Image
or even add in Additional Custom CSS.
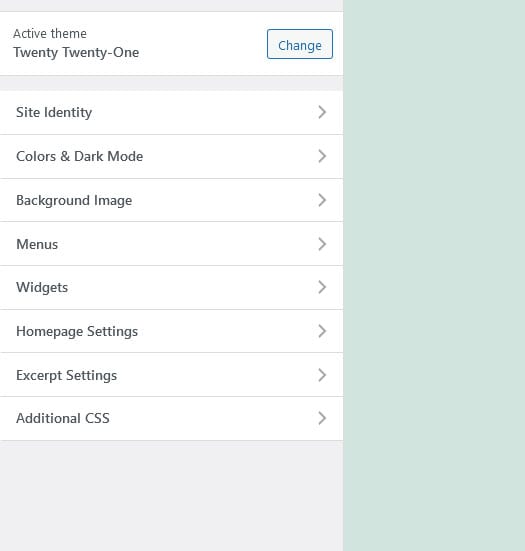
If you are using a premium theme, you would have a whole lot more options to customize your website.
Extend your website
One of the things that makes WordPress so powerful is the fact that it is extendable. What this means is that you can add far more functionality to your website without having to type any code but rather just installing a plugin.
Some of the ways to extend your site include;
- Create an online store with Woocommerce
- Create a learning platform with LearnDash
- Create a social network with BuddyPress
- Create a job listings board with WP Job Manager
and many others.
To install a plugin, you would go to Plugins -> Add New
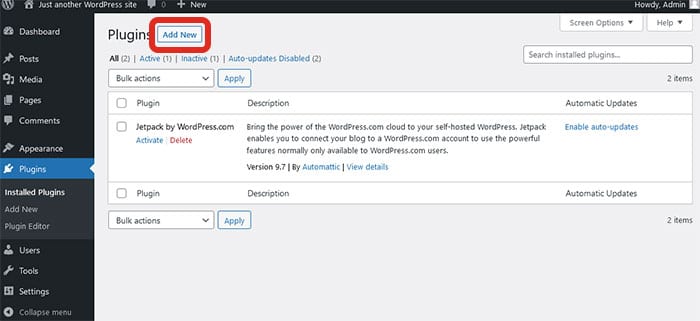
Here you can either upload the plugin you would like to install by clicking the Upload Plugin button at the top or search for the plugin by typing in the search plugins box on the right. It should be noted that when clicking Add New plugin all the plugins being listed are free to use. The premium plugins usually require to be upload and installed.
Once you have the plugin that you want, you just click Install Now.
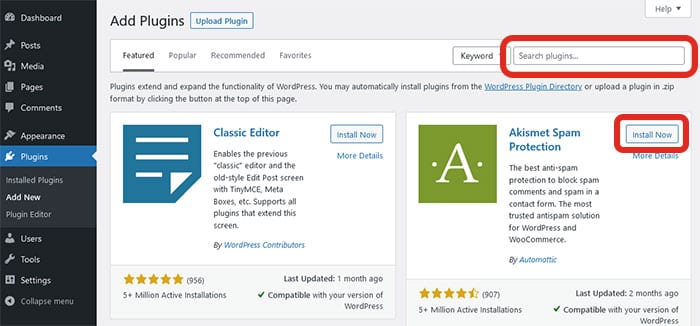
And that is it, now you can go ahead and install all the plugins that you want.
Some of my recommendations are;
A security plugin – you could use either Defender or WordFence as a free plugin.
A caching plugin – you could use either WP SuperCache (Free) or WPRocket (Premium plugin).
An image optimizer – you could use either Imagify or ShortPixel as a free plugin.
An SEO plugin – you could use either Yoast or Rank Math as a free plugin.
And that is it! You have a working WordPress website!
Congratulations!
While you have managed to create the WordPress website in record time, you must know that a website is never truly finished. It is forever a work in progress as you improve or extend upon it as you go along.