Have you always wanted to start a blog but were not sure where to start?
Starting a blog is a dream of many people that want to either develop another income stream or even just have a place to share their thoughts with the world.
No matter which reason you fall under, it is a great idea to start a blog!
So no need to delay it any longer as today I am going to show you how to start a blog step by step.
Just to Clear Some Things Up
I just remembered, before we start, I just want to clear up any quick questions you may have. If you have none, feel free to skip over to the start of the tutorial.
In casual conversations I have been asked the following;
How long does it take to start a blog?
This usually depends on the person starting the blog. If you already know what you want to write about, it will take you around 20 minutes to get your blog up and running. The longest part is usually working out what you want to write about.
How much does it cost to start a blog?
You can have your blog up live on the internet for around $5 a month. You read that correct. For the price of 1 salted caramel mocha from Starbucks, you can cover your monthly cost for your blog.
Do I need to know how to write code to start a blog?
Thankfully not anymore. If you are comfortable using the computer and browsing the internet, you should be just fine creating your blog.
What about those free platforms? Why not just use them?
You can definitely use a free platform if that is the direction you want to go. The only problem is that if that company has to shut down tomorrow, so does your blog. It is better to host your own blog to ensure that you have control over it. Not forgetting that you have more options available to you, if you are hosting your own blog which is a big plus when you want to start monetizing it.
Right, with that out of the way – let’s get started creating your blog!
What to write about on your blog
Trust me when I say, this is usually the most difficult part of starting a blog.
There are fundamentally two reasons people want start a blog;
- To share your thoughts with the world.
- To create a new income stream.
Sometimes people start a blog for both reasons above but 99.95% of the time – it will be at least one of those reasons.
If you truly only want to share your thoughts as a hobby, this frees you up to write about absolutely anything you want. If this is you, you can skip ahead to the technical part of the process.
If you want to create an income stream though, this requires another step in the thought process.
Some qualities you need to cover when deciding on your blog niche.
You need to have passion and interest in the topic.
If you do not enjoy writing about your topic, it is unrealistic to think you can do this for longer than a week. You need something that you are not only passionate about but actually enjoy writing about too. Having a good knowledge on the topic is beneficial but not necessarily required.
To help determine your niche, try answering the following questions;
- What are your interests? Write down around 10 ideas that you are interested in. If you write more than 10, that is fine as we will filter them down later on.
- What are you skilled at? Do you have a sound knowledge of a certain topic? Write it down. If it is in the list you wrote, circle it.
- What are you studying? Experience has shown me that you do not need to be an expert to teach on a blog. You simply need to know a little more than someone else. Many people prefer to learn from someone that is a little ahead of them in their journey as opposed to experts that have already forgotten the smaller struggles you endure when just starting out.
Some topics that are good to test out are;
Finance
Lifestyle
Education
Travel
Fashion
DIY
Fitness & Health
Food
Relationships
Family
You need to have an audience
Just because something interests you, does not necessarily mean that people are searching for it. If they are not searching for it, they will not find and read your blog (..unless you already have a base to market your site to..).
A good step is to have a look at KWFinder to see what people are searching for. Let’s say I want to create a blog on desert gardens. I would go to KWFinder and type in the search term.
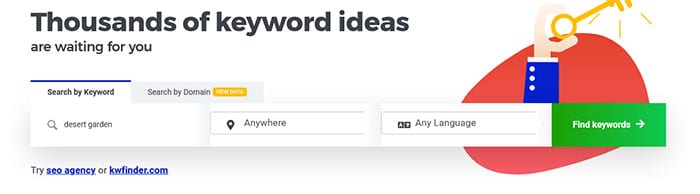
Once you hit the Find Keywords button, you should see the results
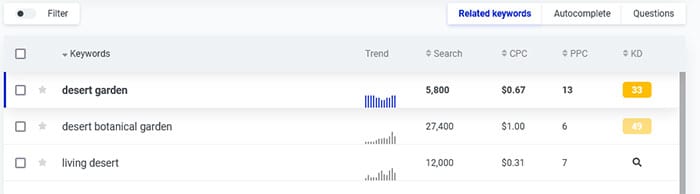
From here we can see that there are 5800 searches a month for this keyword. That is a decent market when looking at a niche. The next thing you would look at is the KD (Keyword Difficulty) which is a number out of 100 that represents how difficult it would be for you to get to the first page of search results. We usually want to get that below 30. I would try and target this one though as from that 33, you can branch off into long tail keywords that could lower your competition.
Next we want to view the trends (..how does the search result perform over a period of time..)

One can see that the keyword has been pretty stable for some time. We just want to make sure that it is not dipping in interest.
You need to solve a problem
Right the last thing you want to do to narrow down your potential niche for your blog is to find out which of your interests has the potential to make some money. We can do this by seeing which of them can solve a problem.
Let’s say you have an interest in gaming. You have over the years gone through a number of bluetooth headsets until you found the one that works best. You could have a blog that targets gaming accessories on a budget. You could write an article on the top 10 headsets you can buy for under $30. In this article you will link to products on Amazon and make some commission every time someone makes a purchase.
By now you should have narrowed the list you initially wrote down and are starting to get a clearer idea as to what topic or niche you should start your blog in.
What Platform to Use
There are many platforms available but if you want to start a blog that you can build into a business, I recommend you go with a self hosted WordPress installation.
I am using WordPress for this blog. If that is not enough, 41% of all websites are using WordPress including companies like Microsoft, Etsy, Zoom, Udemy and universities like Harvard. Even the White House uses WordPress.
So even if you have never heard of WordPress, I can guarantee you have used a website that is powered by WordPress before.
So why use WordPress to start a blog?
There must be a reason why WordPress is the platform of choice for so many websites. Let’s take a look at some of them.
It is super simple to use
If you are able to use a computer and write in Microsoft Word, you will be able to use WordPress to start a blog.
It is easy to extend the functionality
WordPress uses technology called “themes” and “plugins” that allow you to change how your blog looks by clicking a few buttons.
It has a large community
Whenever you have a time that you run into an issue you can rest assured that you can always find help online as WordPress has a large community that answer all questions in forums.
Where should you host your blog?
Right, so now that we have most of the theory behind us, let’s get started on the technical things on how to start a blog.
In this section we are going to cover two things that make up your WordPress blog. These are the only necessary costs to start a blog. They are your domain name and your web hosting.
Your domain name is your permanent address on the internet. The url that you type in to go to the website. In this blog’s case it is oceansauce.com.
Your web hosting is a company that will store your blog and make it available to the public 24/7. In essence, when you start a blog on a web host you are setting it up on a computer somewhere in the world that is always connected to the internet.
I am assuming that since you are reading this tutorial you are new to the hosting world and therefore I will keep it simple by putting both the domain name and hosting under one company. Once you are a little more experienced, I would recommend you separate the two.
Why recommend Dreamhost for beginners?
Over the years I have used many hosts, some were bad and some were just plain awful. Every now and then you get a good one and when you do, you hold on tight.
But don’t just take my word for it.
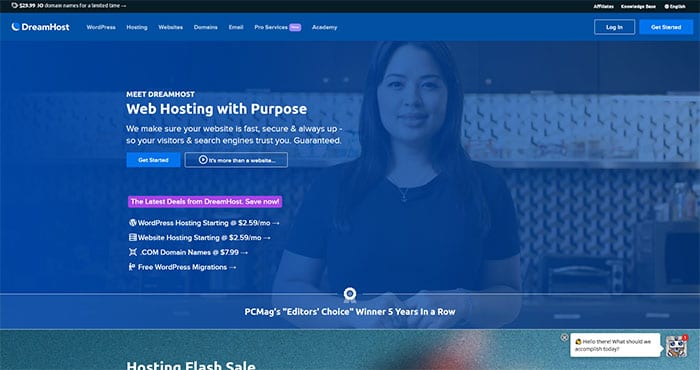
Dreamhost is recommended by WordPress themselves as a host to use. They have a rating of 4.8 out of 5 on Trustpilot and have been PC Mag’s Editor’s choice for the last 5 years. All this is to say that Dreamhost is an excellent host to start your blog on.

Why do I and all those listed above recommend Dreamhost for you to start a blog? Here are a few of the main reasons;
- It is affordable.
- Their servers provide great performance ensuring your site is always online.
- Their support is in house and very responsive.
- WordPress comes pre-installed on your hosting.
Let’s start a blog on Dreamhost
- Sign up for Dreamhost hosting
Go to Dreamhost’s website by clicking here.
Hover over the menu item WordPress and click on the WordPress Basic option.
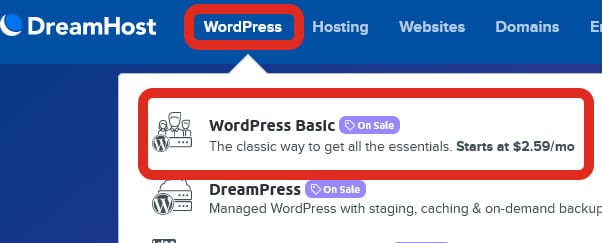
Scroll down and you should see the plans being offered.
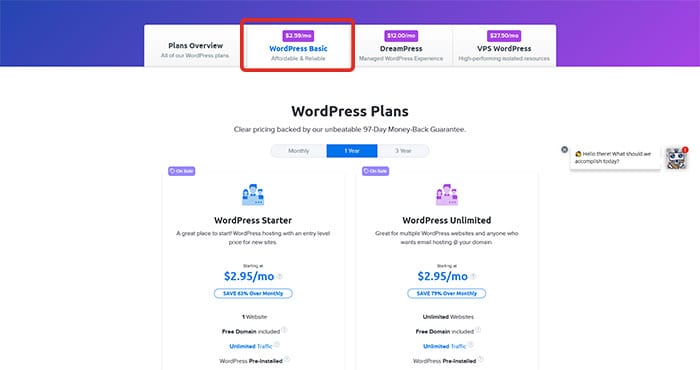
I recommend going with the Shared Unlimited plan for 1 year.
2. Select Register a new domain
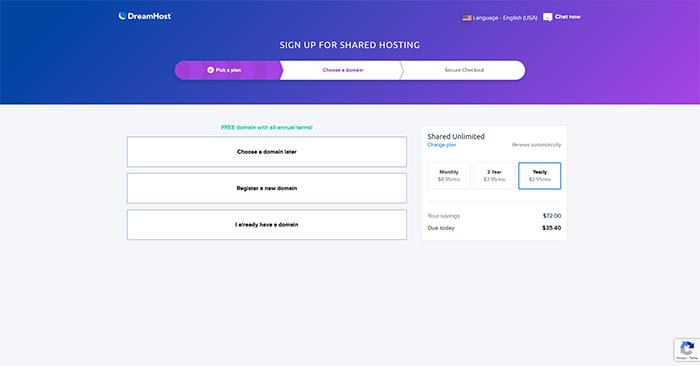
Here you can select the url you would like people to type to come to your website.
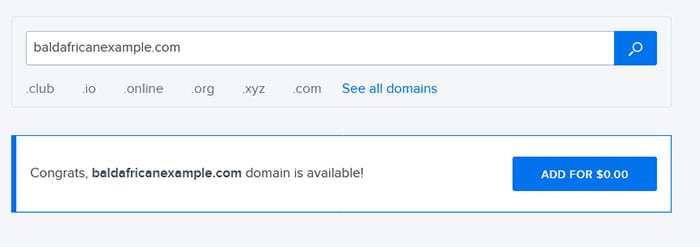
If it is available, click the Add for $0.00 button. Another benefit, if you selected Dreamhost as your host is that your domain name is free for 1 year.
On the next screen you will be asked to confirm a few things. I recommend you remove the Website builder and the DreamShield Protection to save some money. If you feel more comfortable with paying the extra $3 a month for the protection please do go ahead.
Do make sure to keep the Pre-Install WordPress checked as we want that to happen.
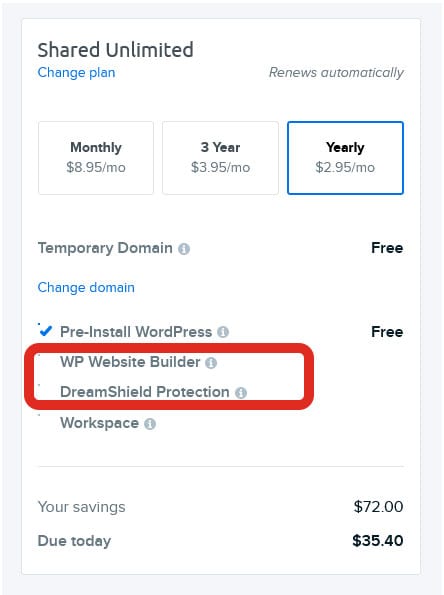
In total you should be paying around $35.40 for the one year of hosting.
Fill out all your billing details and submit your order.
And that is it, you have just purchased your hosting. Feel good?
As I said earlier, a huge benefit of using Dreamhost is that you do not need to install WordPress. It comes pre-installed on your hosting so you can rest assured it is installed securely and you can access it right away.
By now you should have received an email from Dreamhost to confirm that your account is set up. Your login details should be in the email to.
Sign in to your Dreamhost account.
Just before we access the WordPress dashboard, we have one last step – install an SSL cert. Thankfully Dreamhost makes this super easy and free.
Once in your Dreamhost Dashboard, head to your Domains in the left column and click the SSL/TLS Certificates.
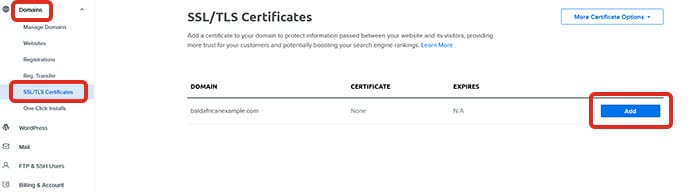
Here you click Add and then Select this Certificate.
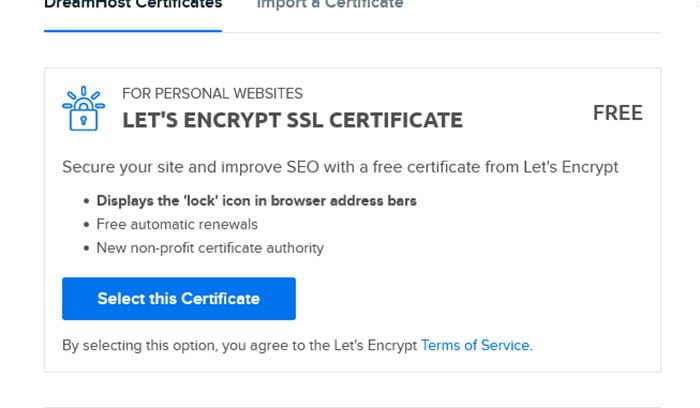
This will add the SSL certificate for your blog.
A Quick tour of the Dashboard
To login to WordPress from your Dreamhost account, click on the Open WordPress Editor button.
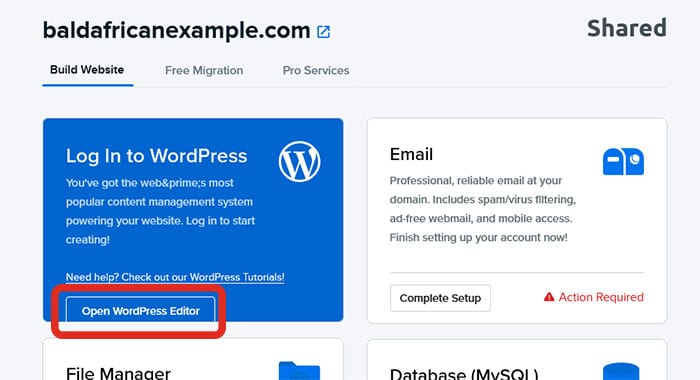
Once logged in you will be faced with the WordPress dashboard where you will spend all your time managing your blog.

Let’s break the dashboard down.
- Posts – This is where you will spend the most of your time. Here you will be writing and publishing all the posts for your blog.
- Media – Here you will manage all the images that are uploaded to your blog.
- Pages – WordPress can be used as a full CMS (Content Management System) too. So if you are creating content that will not change, like an about page or a contact us page, you can create it here.
- Appearance – Here you will manage how your website looks through the use of themes. It is also here that you will create any menus for the blog.
- Plugins – Plugins are what help extend the functionality of WordPress (more on that later). Here you will install, activate and delete any plugins you want on your blog.
- Settings – Under the settings section you will set how you want the foundation of your blog to behave. You can set things like your blog name and description or set what your homepage will be among many other things.
So let’s dive a little deeper into some of these options.
Customizing the look and feel of your blog
WordPress uses themes to determine how it is presented to the blog user/reader. So how your website looks and to a small extent functions is down to your theme. If you want to know more about the technical aspects of the theme, WordPress provides an in-depth article on it.
When you install WordPress it will come with a default theme. This theme is usually the latest one that has been developed by Automatic (the main people behind WordPress) and is relatively simple. I would guess 98% of people usually want to change it.
Well, the good news is that it is very simple to do so.
Thankfully, as WordPress is so popular – there are many designers and developers working on themes all the time. You get to enjoy the end product – theme marketplaces.
Here are just a few places you can find themes;
WordPress.org – Here you will find the official database of themes available. They are all available for free.
Elegant Themes – A premium theme provider that for one annual fee gives you access to two great themes using a visual builder.
GeneratePress – An excellent theme for blogs as it is lightweight, blisteringly fast and very simple to customize. The theme itself if free but it has a premium upgrade.
Thrive Themes – Thrive is a great choice if you are starting your blog with monetization in mind. Their features are focused on conversion of users from visitors to customers.
How to install a WordPress theme
To install your theme, you would head to the Appearance section and click on Themes.
To add a new theme, click Add New

In the repository you can install any theme for free. To do so you would move your mouse over the theme and click Install
Once the theme is installed, you would click Activate and you are done. The new theme is installed!
Make the blog your own
Once you have activated the theme it is time to make the blog your own by customizing it further.
Themes will either have a Theme Options or a Customizer section. In here you will be able to set the Site Identity, Colour Scheme, Background Images, Menus and Widgets as well as the ability to add some extra CSS if you so choose.
Play around with these as you will until you find the look and feel you like and then hit the Publish button at the top.
Extend your blog functionality
Up until now we have only been changing how the blog looks, now we are going to change how the blog functions. WordPress makes this easy with the use of plugins.
Plugins are exactly as they say – the are code that “plugs into” your default WordPress code to extend the functionality.
Unlike with themes, you are free to install as many plugins as you want although I do advise to keep to only the plugins that you need.
Just like with themes they come in both free and premium (paid) versions.
A great place to get plugins to start your blog with;
WordPress.org – Here you have access to thousands of free plugins. Always remember to check the “last updated” date to ensure that the plugin is till be actively maintained.
Plugins I suggest when you start a blog
If you have gone to the WordPress repository you might have been either very excited or overwhelmed by the sheer amount of plugins available. It is important to try and keep the amount of plugins you install on your blog to only those that you need.
I recommend that you install a plugin for each of the following when starting a blog;
Security plugin – my recommendation is wordfence
Performance plugin – my recommendation is wprocket
SEO plugin – my recommendation is rank math
Form plugin – my recommendation is forminator
Analytics plugin – my recommendation is sitekit
When you start a blog those plugins should be enough to get you going.
How to install a plugin
To install WordPress plugins on your blog;
In your WordPress dashboard,
Head to Plugins -> Add New
If you want to search for free plugins just type the name of the plugin in the search field
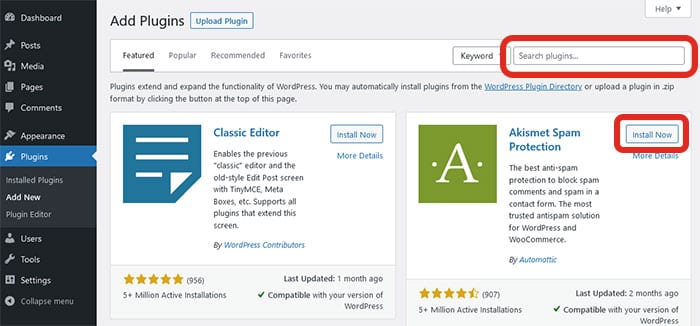
Once you find the plugin you want to install, just click the Install Now button
Once it is installed the button will change to Activate be sure to click that to activate the plugin in your blog.
Write and publish your first blog post
Finally we reach the point you started the blog for – writing posts!
Creating a blog post in WordPress is super easy and thanks to the active development, it is becoming even easier with each new update.
In your WordPress dashboard, go to Posts -> Add New
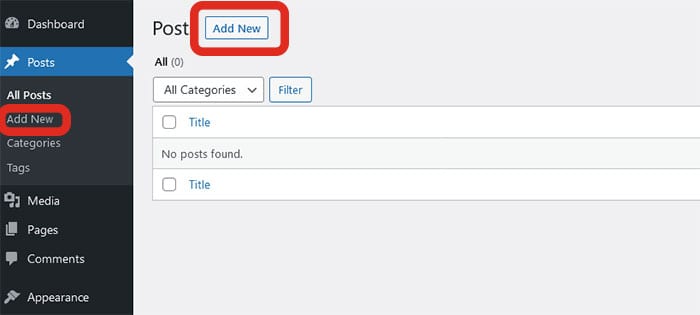
This will open WordPress’ Gutenberg editor and is where you will be adding in all your content for the post.

Click the Add Title and you will see it disappear leaving space for you to write your title.
Try to keep your title as relevant to your post as possible. If you have a KWFinder account, it would work well to include your keyword from your research in your title for SEO.
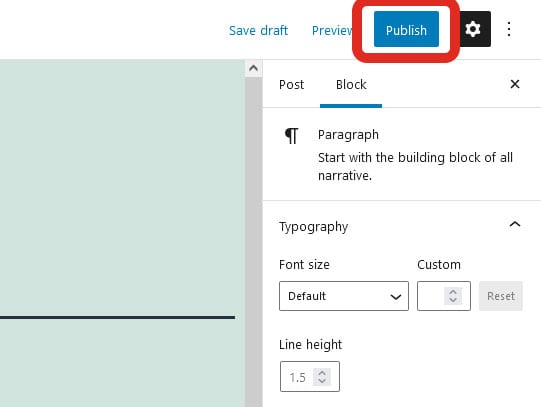
Once your title is done, move on to your post content and write your full post out by making use of the Gutenberg features.
When your blog post is complete, you can click the Publish button to make it live for everyone to read.
Some quick tips to help you write your blog posts
- Write like you are speaking to your friend – People often relate more to informal writing rather than academic writing. So do not overthink it and instead write it like you would speak it to a friend.
- Keep focused on the topic – people have limited time so they usually want to get their information quickly. Do not stray off topic for each post that you write.
- Format your headings correctly – make sure to separate your content with headings to ensure that it is not just one long piece of text.
- Double check for typos – as much as is possible, try to make sure that there are no typos in your text (easier said than done as I still have the occasional typo).
Drive traffic to your blog
At the end of January 2020, there were 1,295,973,827 websites on the internet. Statistics show that an average of 576,000 websites are added to the internet each and every day. Thinking that all you need to do it build the site and people will magically appear is sadly no longer the case.
To get traffic to your site requires a strategy. Thankfully there are many that you can use.
Organic SEO Traffic
This is the long term strategy.
You want to target what we call keywords and let them rank in search engines so that your blog will rise in the rankings.
Ok, perhaps let’s say that in English this time.
Keywords are phrases that people search for in Google or any other search engine to find information. I touched on this above during the find your niche exercise. There I showed how you can use KWFinder to see how many people are searching for the keywords.
When you find the keyword you would like to target, you would then place that keyword in;
- Your blog’s permanent url
- The title of your post
- Your first paragraph of your blog post
- At least one of your subheadings
- Keep it between 1% – 3% of all your content
- Alt tags of your images
Once you have implemented this, the foundation has started building.
Social Media
If you have a following on Social Media, you can drive traffic from there to your website by sharing relevant information.
Be careful that when sharing on your own social media or in social media groups that what you are sharing is relevant and helpful to the audience.
An example of this is if you are in a Facebook group talking about car restoration, you will likely not get much traction sharing info about baby clothes. In fact, you may be kicked out of the group. Instead, try writing a blog post about the 12 best restorations ever done (assuming this is what your blog is about) and then post that article in the Facebook group.
Interview an Influencer
Influencers have a huge following and often are open to more publicity if your blog is linked to their brand. An interview with them is a great place to leverage off their name as well as their following.
Run an Ad campaign
If you have a blog that is monetized and you want a quick influx of traffic, you can always run a targeted ad campaign. You can find them on google, facebook, linkedin, instagram and even twitter. Just be sure to target the platform that your chosen demographic uses. These can be a great way to drive immediate traffic but keep in mind if your blog is not optimized to convert the traffic into paid users, it can become quite an expensive exercise.
Monetize your blog
This is the part you have been waiting for right? You are not alone.
We all want to earn a little extra cash on the side. I will share a quick 3 ways you can monetize your blog;
Affiliate Marketing
Using affiliate marketing, you get paid a small commission when you refer customers to a product or service. The trap that most people fall into here is to refer the most expensive products as that makes the most commission right? Well, not necessarily.
The best products or services to market as an affiliate marketer is the product or service that you yourself use and believe in.
Provide a service
Plenty of bloggers that run successful blogs offer a service that is connected to the niche that their blog is about.
Let’s say that your blog is all about becoming more efficient, you could offer a service that you can consult with people or businesses to make them more efficient. If your blog is about nutrition, you could provide a service where you will help them build out a menu that could help them reach their goals.
Keep in mind
Building a blog that you can turn into a business takes both time and effort. It is very rare that you will make money overnight. Do not let that deter you though as some are making as much as $200k a month!
and that’s it…
Congrats! You have a running blog. You have already taken a step that 80% do not and that is to actually – start a blog!
I wish you the best on your blogging adventure.